Add/Delete QSOs to/from Groups
Add/Delete QSOs to/from a Group
There are some situations where it is not possible to automatically select all of the QSOs to be submitted for an award. In this case it is necessary to manually add or delete QSOs to the Award Group. This section describes the techniques used to do that.
Adding QSOs from a Logbook View
The first example describes using the Filter function to select QSOs.
Steps 1 through 4 are common to all examples:
Start by following the setup procedure described below: open a Logbook View, load the Query, and define a Group.
-
Open a Logbook View by selecting View Î Logbook from the main menu.
-
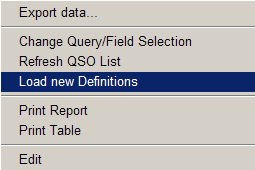
Load a Query which contains the DXCC-Field. For this example use LOGBOOK with DXCC and Zones.SPQ. This query is usually found in the following directory: ...\SWISSLOG\Queries\Logbooks. If the View Logbook window is already open then you can change to another Query by selecting Load new Definitions from Functions on the main menu, or by activating the pop-up menu. To activate the pop-up menu position the mouse cursor anywhere within the log and right-click.
-
Select the query: LOGBOOK with DXCC and Zones.SPQ
-
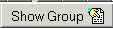
Press the
 (Show / Hide group
toolbar) button. This will display the group toolbar.
(Show / Hide group
toolbar) button. This will display the group toolbar.
Selecting QSOs using the Filter function
For this example we will assume that the QSL card from ES6OJ is not available because it was submitted for another award, or it was lost. In this case you have to delete the ES6OJ QSO from the group and add another QSO for the ES DXCC entity.
-
Select the 80m DXCC AWARD group as Target-Group
-
Press the
 button. This displays a group view for the selected
group.
button. This displays a group view for the selected
group.
-
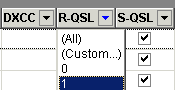
Press the black arrow button in the R-QSL column heading and select the number 1 from the list. This selects only QSOs for which you received a QSL card.
-
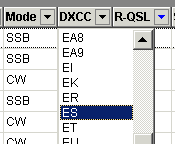
Press the black arrow button in the DXCC column heading and select ES from the list. This selects only QSOs with the DXCC entity ES.
-
At this point, by using the Filter function, you have specified that only QSOs with the DXCC entity ES, which have been confirmed by receipt of a QSL Card be displayed. You can verify this in the active filter panel on the bottom of the screen as shown on the next line:

-
From the list of ES contacts displayed, select the QSO you want to add to the Award Group and press the
 button. This will add the
filtered QSOs to the group.
button. This will add the
filtered QSOs to the group.

-
Since you just added another ES contact to the Award Group, you will now see two QSOs with the DXCC entity ES you need to delete the QSO that is not valid.
-
Select the QSO to be deleted (ES6OJ) from the group view and press the
 button to delete it. Note:
this will not delete the QSO from your logbook of course, only from
the group!
button to delete it. Note:
this will not delete the QSO from your logbook of course, only from
the group!

Selecting QSOs with the Group function
This examples describes how to select QSOs using the Group function.
For this example we will assume that you are selecting QSOs for the 5 Band DXCC.
-
Select the 5Band DXCC AWARD group as Target Group
-
Press the
button. This displays the group view for the selected
group.
-
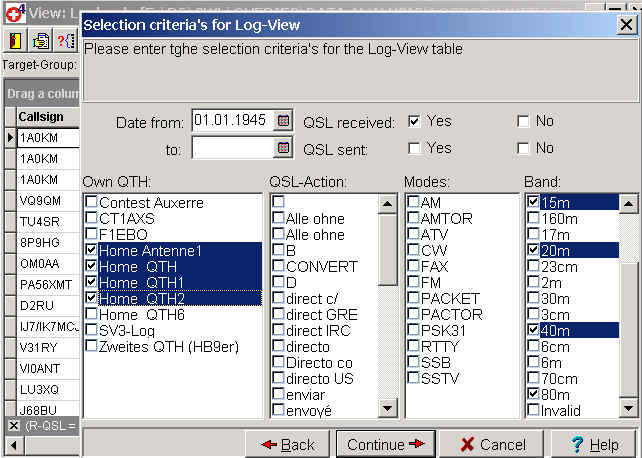
Press the Manual tab located in the lower left corner of the Logbook View window.
-
Now mark the selection criteria as shown below:
-
In the Date from: and to: windows specify the valid date range.
-
Check the box for QSL received: Yes. This will select only confirmed QSOs.
-
In the Own QTH column select the valid QTHs.
-
In the QSL-Action column no selection is necessary. This means 'don't care'.
-
In the Modes column select the valid modes. There are none marked in this example which means all modes are selected.
-
In the Band column mark 80m, 40m, 20m, 15m, and 10m. This selects only QSOs for the 5 traditional HF Bands.
-
-
Press the Continue button.
The results of the QSO selection process will be displayed in the Logbook View window. If you followed the steps described in the example above, only confirmed QSOs made on the 5 selected bands will be displayed.
-
The next step is to group the QSOs by DXCC. There are two way to achieve this:
-
Drag the DXCC column heading to the group panel.
-
Right-click on the DXCC column heading and select Group By This Column.
-
The result will look like the screen image below:
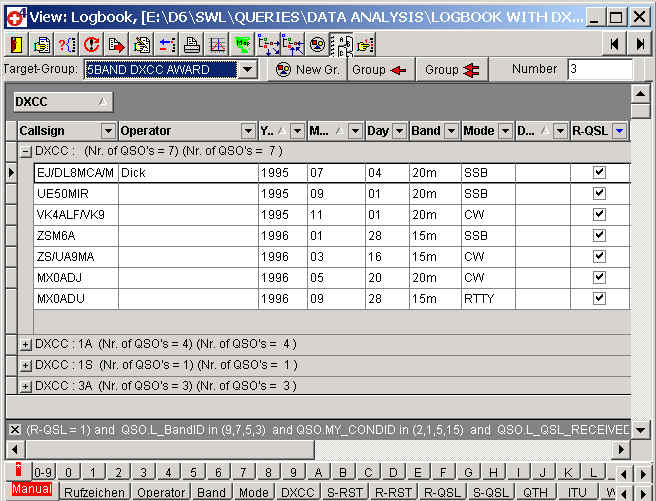
The QSOs are now grouped by DXCC. To select the QSOs you need follow the next three steps:
-
For each DXCC you intend to use, click on the + sign (at the left edge of the display) to expand the view.
-
Select the QSO you want to add to the Award group.
-
Press the
button.
Adding QSOs with the help of a Statistic View
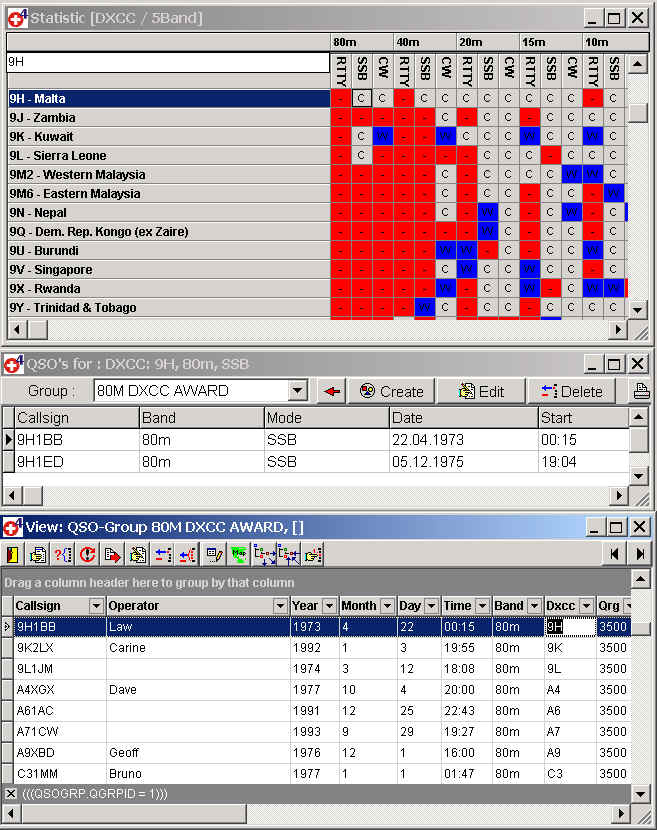
You can also add QSOs to a Group with help from the Statistic View. In this example we will select another QSO for the DXCC 9H. This is how this works:
-
Open the DXCC Statistic:
-
Select View Î Statistic from the main menu
-
Select the DXCC Statistic
-
-
Select the 9H entry by typing 9H into the search field. (The search field is the window at the top of the list, see example.)
-
Double-click on the 80M SSB cell. This opens a view with the confirmed QSOs with 9H on 80m.
-
Arrange the windows as shown below:
-
As shown in the image directly above (QSO-Group View) locate the QSO with the DXCC 9H.
-
Now using the Incremental Search Function, click on the DXCC cell and type 9H (see Incremental Search if you need more information).
-
The QSOs with the DXCC 9H are now displayed in the QSO-Group View window (refer to the screen image above).
To replace the QSO with 9H1BB with the one with 9H1ED you have to perform the following five steps:
In the window QSOs for: DXCC: 9H, 80m, SSB:
-
Select the 80M DXCC AWARD group.
-
Select the QSO with 9H1ED.
-
Press the
 button to insert the selected QSO into the group.
Now you have two 9H QSOs in the QSO-Group View; so you need to delete the unwanted QSO.
-
Select the QSO with 9H1BB
-
Press the
button to
delete this QSO from the group.
If you have enough QSOs to apply for the award you need to print the application form. The next step will explain this.