Import QSO's
SWISSLOG allows you to import QSOs from most other logging programs. You can
import logs with the following formats:
-
ADIF (Amateur Data Interchange Format). Many programs support this
format for easy data exchange; whenever possible use this format.
-
dBase files
-
Paradox files
-
Text files
-
Access databases
-
SWISSLOG Version 3 (DOS) – see Import from DOS for special considerations
-
SWISSLOG Database
Prepare for the Import
To import QSOs from another log program perform the following steps:
-
Make a backup copy of your current SWISSLOG database!
 IMPORTANT:
Before attempting to import any QSOs into SWISSLOG it's very important to
create a backup copy of your existing log. In some cases, the import
process may not work exactly as intended on the first try. If you have not
saved your database and something goes seriously wrong it is nearly
impossible to recover!
IMPORTANT:
Before attempting to import any QSOs into SWISSLOG it's very important to
create a backup copy of your existing log. In some cases, the import
process may not work exactly as intended on the first try. If you have not
saved your database and something goes seriously wrong it is nearly
impossible to recover!
Use the SWISSLOG Save
function, and/or copy your existing log database into another directory,
or make a copy with a different name in the same directory. It's not a bad
idea to have more than one backup copy.
-
Determine the format of the log you want to import.
-
If you can not find a method to create an ADIF file try to determine
what database format the original log files were created in. The
following database formats can be imported directly into Swisslog:
-
dBase (file extension *.DBF)
-
Paradox (file extension *.DB)
-
Access (file extension *.MDB)
-
If the source was created in any other format you might try exporting
the QSOs as a text file. Some logging programs will directly export the
QSOs as a text file; other programs may support exporting to Excel (or
another program) which will then allow exporting as a text file. If the
above suggestions do not work the only remaining option may be to print
the QSOs and redirect the printer output to a file.
-
If you've exhausted all the possibilities and there is no way to produce
a text file contact tech support at
www.swisslogforwindows.com
Start the Import
Start the import process by selecting File ¦ Import QSOs and select
the import function corresponding to the file type. This will display the
following dialog window:
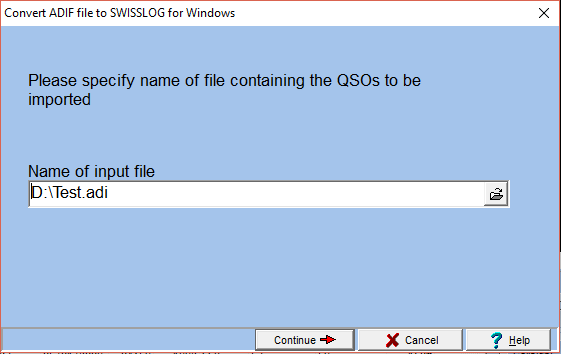
In the above dialog window enter the name of the file you are importing. You
can type the filename or search for it by pressing the  button.
After you have specified the import file press the Continue button. The Field
Assignment dialog window will appear next:
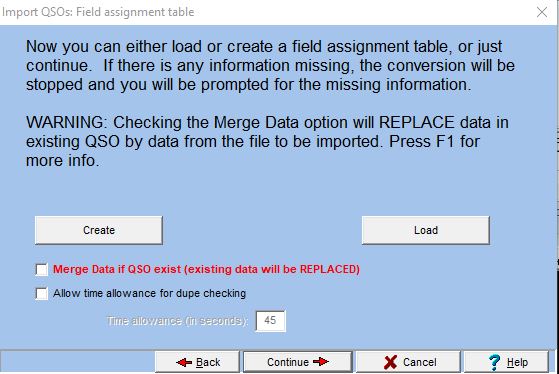
The dialog window shown above allows you to create or load a Field Assignment
Table. This is optional; if you don't do it now and a table is needed at a
later stage then SWISSLOG will ask you again at that time. The Field Assignment Table is
explained further in this document.
Reasons for creating or loading the Field Assignment Table are:
-
Load it – if you created a Field Assignment Table in a previous import
file and you are dealing with the same format again.
-
Load it – if you received a Field Assignment Table (.FLD) from another
SWISSLOG user and want to make sure that you get exactly what was
intended.
-
Use Create – if you want to explore the existing fields in a dBase,
Paradox, or .MDB database. You can directly assign the imported fields to
SWISSLOG fields.
-
Optionally use Create for text files to define the field assignments. You
can also do this later if you do not want to do it at this point.
-
Use Create if you want to apply QSL rules during importation process, even
if you don't want to assign fields directly (you can apply QSL rules
and/or QSL actions from Membership)
| MERGING DATA IN EXISTING QSO |
|
Check the option "Merge Data if QSO exist" if you are importing
QSOs from a
file having most updated data from existing QSO and you want to replace
these data. For instance, this is very useful if you want to update the QSL SENT indicator
when using external printing tools which provides a file, Online QSL
Requests (OQRS) files, etc.
NOTE: If you want to handle OQRS files from Club
Log, please read
Process Club Log OQRS ADIF
file. Swisslog implements a specific function to process this file in
an automatic way.
VERY IMPORTANT:
An exact QSO must be found in order to merge data.
This means: same call, same band, same mode, same date and
same time (including seconds!). If
you have an existing QSO at 14:45:25 and the import file has the same QSO
with time at 14:45:00, Swisslog will ADD a new QSO,
no data will be
updated! Check this carefully in the import file before enabling this option!
Swisslog will replace the contents of the following fields (only if
content is not blank and is different in the source file):
LOGBOOK TABLE:
L_OPERATOR, L_RSTS, LRSTSNR, L_RSTR, L_RSTRNR, L_QSL_ACTION, L_QSLMGR,
L_QSL_RECEIVED, L_QSL RECEIVED DATE, L_QSL_SEND, L_QSL SEND DATE,
L_LOTW_RECEIVED, L_LOTW RECEIVED DATE, L_LOTW_SENT, L_LOTW SEND DATE,
L_EQSL_RECEIVED, L_EQSL RECEIVED DATE, L_EQSL_SENT, L_EQSL SEND DATE,
L_CLUBLOG_UPLOAD_STATUS, L_CLUBLOG_UPLOAD_DATE,
L_HRDLOG_UPLOAD_STATUS, L_HRDLOG_UPLOAD_DATE,
L_QRZCOM_UPLOAD_STATUS, L_QRZCOM_UPLOAD_DATE, L_SFI, L_INCOMPLETE,
L_CREDIT_GRANTED, L_CREDIT_SUBMITTED, L_SAT_MODE, L_SAT_NAME
PQTH TABLE:
P_CONTINENT, P_DXCC, P_WPX, P_WAE, P_WAZ, P_ITU, P_LATITUDE, P_LONGITUDE,
P_TIMEDIFF,
P_QTH, P_QTHLOCATOR, P_REGION, P_SUB_REGION, P_IOTA, P_DIPL1...P_DIPL20.
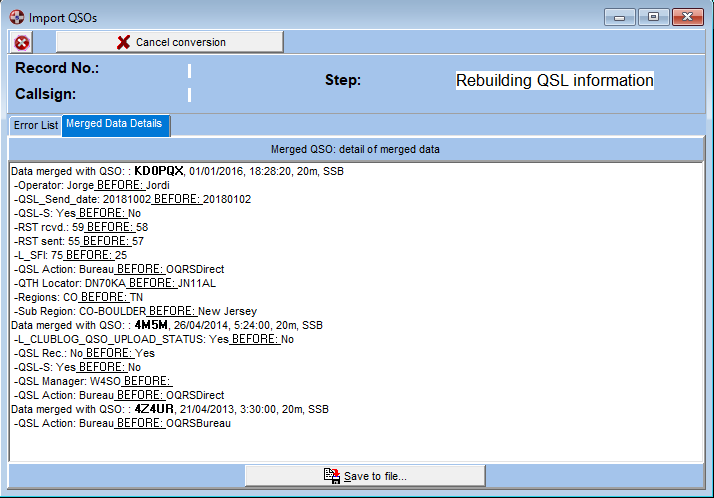
Later, during the QSO import process, the "Merged Data Details" tab will be highlighted indicating user that
some data have been merged in at least one QSO. Swisslog will provide a very
detailed report for every QSO, including data that has been replaced
and data existing before. A button is available to Save the report to
a file in Rich Text format for future reference:
|
-
Allow time allowance for dupe
checking: Here you can define a time allowance to avoid importing
QSOs with the same station, band, mode and date in a range of time
differences. Default time allowance is +-45 seconds but you can define any
time in seconds. This is very useful when importing the ADIF file from
WSJT-X, JTDX or from online services where time for an existing QSO can
differ some seconds or even several minutes.
When you are finished press the Continue button. The summary dialog window
will appear next:
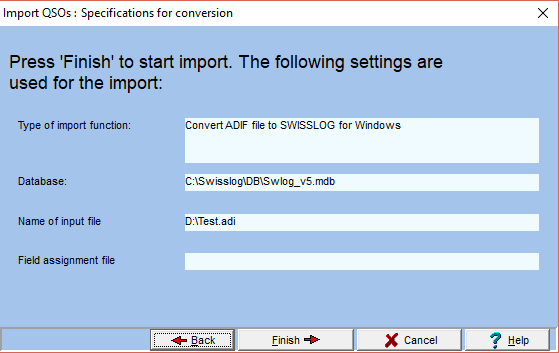
The dialog window shown above allows you to verify the data entered
previously. It displays the following:
-
The database that you are importing into – the target file
-
The file that you are importing from – the source file
-
The Field Assignment Table you have loaded (if any)
If you notice an error you can press the Back button and correct it.
Note: this dialog window looks different if you are importing from the DOS
Version of SWISSLOG (see details here).
If everything is OK press the Continue button.
Now select the My QTH for the QSOs you are going to import.
IMPORTANT:
Remember you can only import QSO for one
My QTH!.
If the log you're importing contains QSOs from more than one QTH, you
will have to split the log files into separate files, each containing QSOs for
only one QTH. (See Plan your import above).
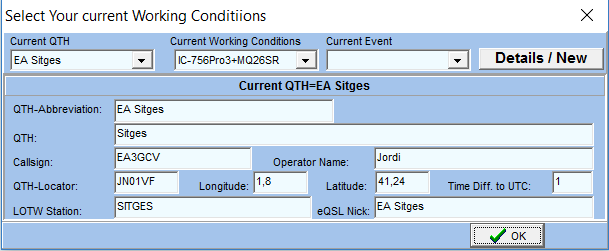
Select the appropriate QTH in the Own QTHs list by clicking on it and then
press OK. This starts the actual QSO import process.
If you have not selected a Field Assignment Table and SWISSLOG encounters some
data in your source file that it's unsure what to do with then you will be
presented with the Field Assignment dialog.
SWISSLOG needs to copy the field values from the import file to the
corresponding SWISSLOG fields. It has to convert Band, Mode, QSL indicators,
and more. The instructions defining how this must be done are contained in
Field Assignment Table.
If SWISSLOG does not know what to do with an input value it will ask you for
information by popping up the Field Assignment Dialog window, which is the
input window for the Field Assignment Table. You must enter the assignment
information or tell SWISSLOG to ignore the field. Depending on the missing
information another page of the dialog is opened. Use the links below to
navigate to the corresponding description.
For import files from the DOS version of SWISSLOG and ADIF files SWISSLOG
knows how to map the standard fields. Note that some programs do not use
"standard" ADIF files and SWISSLOG will still have to ask you what
to do with the non-standard information.
If SWISSLOG needs information from you the Field Assignment Dialog window is
displayed with the page opened where the information must be entered.
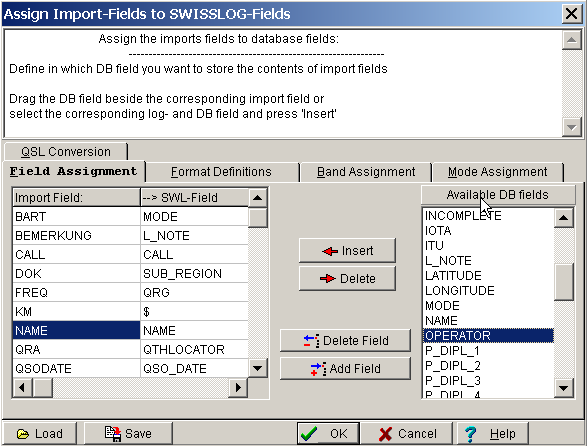
In the above dialog window you can assign the various fields from the import
file to SWISSLOG fields.
-
The table on the left displays the name of the field from the import file
(Import Field) and the corresponding SWISSLOG field which the import field
is mapped to (--> SWL-Field).
-
The list on the right side of the dialog window (Available DB Fields)
displays all of the SWISSLOG fields.
You must enter the name of the SWISSLOG field that corresponds to the import
field by inserting it next to the name of the Import Field.
You can do this by using one of the following methods:
-
Mark the import field and select the corresponding SWISSLOG field from the
list of Available DB fields and press the Insert button. (Mark the fields
by placing the mouse cursor over the field name and click).
-
Drag and Drop the SWISSLOG field from the list of Available DB fields to
the SWL-Field list next to the corresponding import field.
Field assignment for text files
Fields in text files do not have names. Therefore field position numbers are
used to identify the fields in the input file. Text files have either a format
with fixed columns, or are delimited (see Format
Definitions). The numbering of the fields is different for either format.
Below is an example of field assignments for a file with a fixed column
layout:
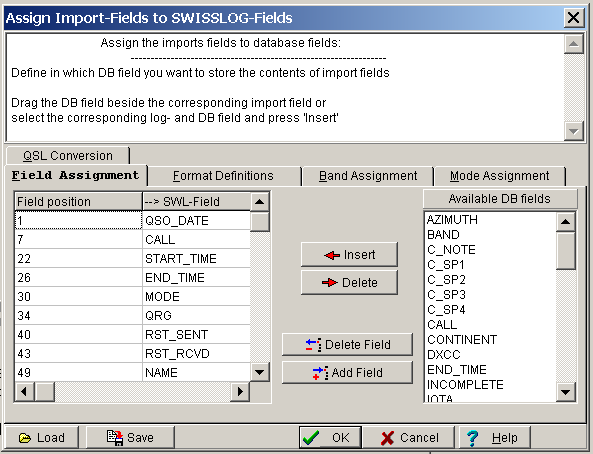
Use the Add Field button to add new fields
If you often need to import data from text files with non-standard
formatting then it is a good idea to save the Field Assignments so the next
time you won't have to do all this again; but instead you can simply load
those saved Field Assignments!
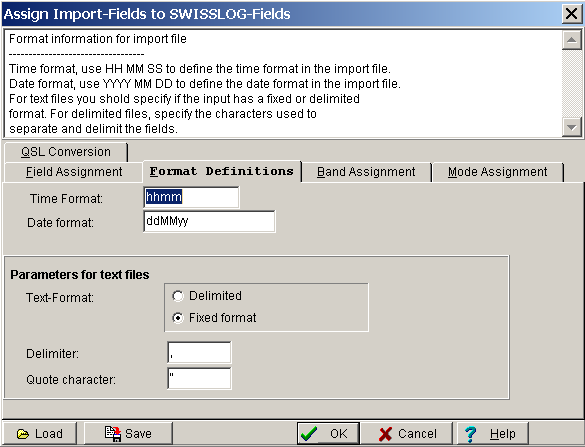
In the above dialog window you define the format of the Time and Date fields
that are used in the input file. If the input file is a text file you also
need to define the format of the text file.
-
Time Format: enter the time format using the characters shown below
-
H = Hours
-
M = Minutes
-
S = Seconds
-
Date Format: enter the date format using the characters shown below
-
D = Day
-
M = Month
-
Y = Year
-
Text format: if the input file is a text file, select the appropriate
format
If the input file is a delimited text file
define the delimiter and quote character
-
Delimiter Character: Character used to delimit (separate) the fields
-
Quote Character: Character used to frame a field (placed at the beginning
and end of a field). Framing is necessary for fields containing blanks.
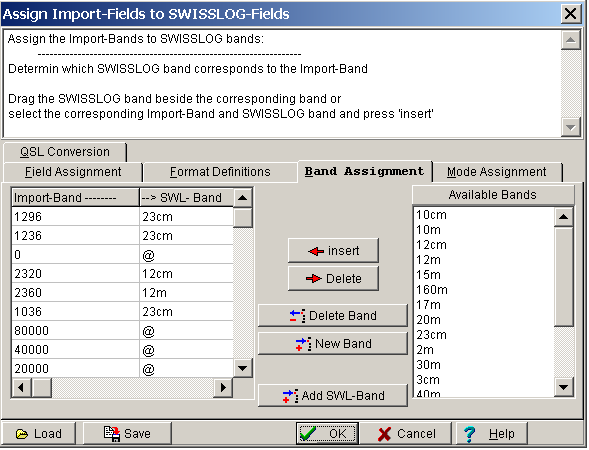
In the above dialog window you can define how the bands in the input file are
converted to bands in SWISSLOG. Older log programs did not enforce a
consistent naming of the bands. Therefore you may have to make several entries
in this list. During the import process SWISSLOG stops at every unknown band
entry in the input file and asks you how it should be converted.
-
The table on the left displays a list of the bands in the import file
(Import Band) and the corresponding SWISSLOG band that it will be
converted to (--> SWL-Band).
-
The list on the right side of the dialog window (Available Bands) displays
the SWISSLOG bands.
You must enter the SWISSLOG band that corresponds to the import band by
inserting one of SWISSLOG's available bands next to the name of the import
band.
You can do this by using one of the following methods:
-
Mark the Import Band and select the corresponding SWISSLOG band from the
list of Available Bands and press the Insert button. (Mark the fields by
placing the mouse cursor over the field name and click).
-
Drag and drop the SWISSLOG band from the list of Available Bands to the
SWL-Band list next to the corresponding import band.
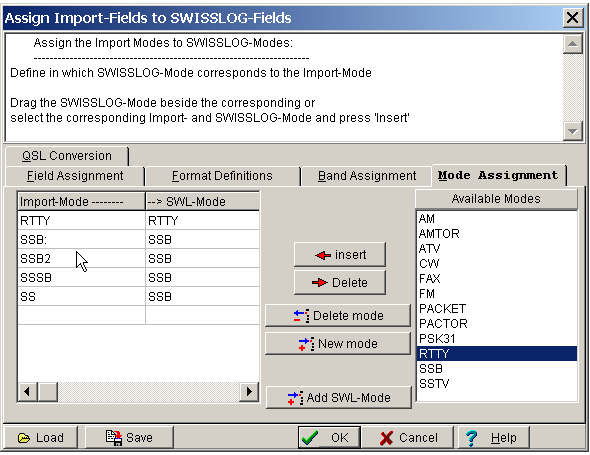
In the above dialog window you can define how the modes of the input file are
converted to modes in SWISSLOG. Older log programs did not enforce a
consistent naming of the modes. Therefore you may have to make several entries
in this list. During the import process SWISSLOG stops at every unknown mode
entry in the input file and asks you how it should be converted.
-
The table on the left displays a list of the modes in the import file
(Import Mode) and the corresponding SWISSLOG mode that it will be
converted to (--> SWL-Mode).
-
The list on the right side of the dialog window (Available Modes) displays
the SWISSLOG modes.
You must enter the SWISSLOG mode that corresponds to the import mode by
inserting one of SWISSLOG's available modes next to the name of the import
mode.
You can do this by using one of the following methods:
-
Mark the Import Mode and select the corresponding SWISSLOG mode from the
list of Available Modes and press the Insert button. (Mark the fields by
placing the mouse cursor over the field name and click).
-
Drag and drop the SWISSLOG mode from the list of Available Modes to the
SWL-Mode list next to the corresponding import mode.
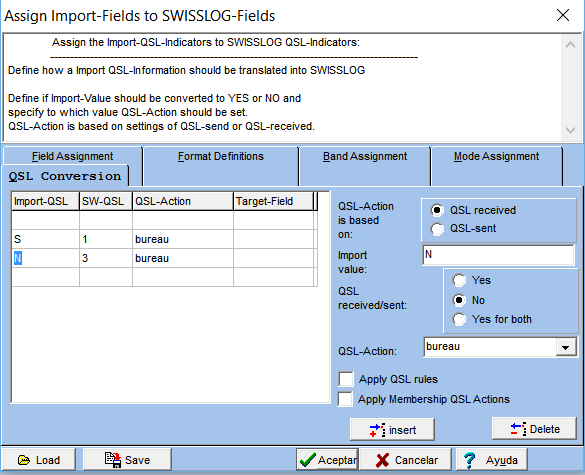
In the above dialog window you can define how the QSL information should be
converted. This definition may become very complex if you used a sophisticated
QSL control system in the log program you're importing from. The example above
shows such a case.
SWISSLOG uses three QSL Indicators to implement a QSL control system:
QSL-Sent, QSL-Received and a field named QSL-Action. The QSL control system is
very comprehensive; for complete details please read the following sections: QSL-Rules
and QSL-Actions.
IMPORTANT: SWISSLOG assumes that the values used
in QSL-Sent and QSL-Received mean the same thing for both fields.
The table on left side contains the current QSL conversion settings for the
input values.
-
Import-QSL is the value in the input field.
-
SW-QSL defines how the QSL indicators in SWISSLOG will be set for
this input value.
-
1 = the target QSL indicator will be set to YES
-
2 = both the QSL-Received and QSL-Sent indicators will
be set to YES. This is for programs which used only one indicator.
-
3 = the target QSL indicator will be set to NO
-
QSL-Action: the value that should be set in the QSL-Action field.
This is very important: as you can see in the example above, this
information was coded in the QSL indicators with various characters. The
QSL indicators in SWISSLOG can only be on or off (YES or NO). Therefore
the meaning of the characters used in the import log must be put into the
QSL-Action field.
-
Target-Field: this is an information only field. When SWISSLOG does
not know how to convert a value it opens this dialog. The Target-Field
tells you that SWISSLOG was about to convert the input field to the
QSL-Received or QSL-Sent indicator.
With the radio buttons on the right side you can define how the input values
should be converted.
Remember: SWISSLOG assumes that you use the
same values in both the QSL-Received and the QSL-Sent indicator.
Let's go through an example: you use Y for YES and N for NO. Next you
want to set the QSL-Action to 'Send' if a QSL card was not sent, or
set the QSL-Action to 'Sent' if a QSL card was sent. In this case the
QSL-Action field should be based on the value of the QSL-Sent indicator. For
a N value you specify 'Send'; for a Y value 'Sent'.
-
Import-Value: the value in the input field for which this settings is
valid.
-
QSL-received / sent: select how the QSL indicator should be set. Yes for
both means that QSL-Received and the QSL-Sent indicator will be set to
True (Yes).
-
QSL-Action: Select the action which should be enabled. Note: If the
"Apply QSL Rules" checkbox is marked this setting is
overwritten.
-
Apply QSL Rules: if this checkbox is marked QSL-Action is set according to
the QSL-Rules.
- Apply Membership QSL Actions: if this checkbox is marked, QSO will be
checked with the LoTW and eQSL users list and with URE, URA, and RCA members list
(only in case of EA, C3, and LU stations respectively), setting the following QSL
Actions:
- LoTW: if callsign is LoTW user
- eQSL: if callsign is eQSL user (eQSL AG or eQSL regular member)
- LoTW+eQSL: if callsign is both LOTW and eQSL user
- Direct: if callsign is a EA/C3/LU station it performs an online lookup
to check if is member of URE (the Spanish Amateur Radio Association),
URA (Andorra Amateur Association), or RCA (Radio Club Argentino) o respectively. "Direct" will
be set in case the EA/C3/LU callsign is not member of URE/URA/RCA and neither
user of LOTW or eQSL. This is useful to avoid sending a QSL card via
bureau to a non-bureau member.
- EURAO: an online lookup is performed to check if callsign is member
of EURAO (European Radio Amateurs' Organization).
In case the callsign is EURAO
member but not LoTW, eQSL, URE, URA and RCA member the QSL action will be set to 'EURAO'.
Please visit the
Euro Bureau
QSL website to check if there is in your country an entry
point to EuroBureauQSL.
IMPORTANT:
Enabling this option may slow down the importation process
considerably. Internet
connection is needed to apply this QSL action.
To simplify importing a log file from SWISSLOG DOS there are additional
'wizard' steps which are explained below:
IMPORTANT:
If the log you're importing
contains QSOs from more than one QTH you will have to split the log files into
separate files, each log containing QSOs for only one QTH. (See
Plan your import above). Use SWISSLOG Version 3
DOS for creating the separate input files.
SWISSPEZ-File

You can add your special conversions to this file if necessary.
Notes
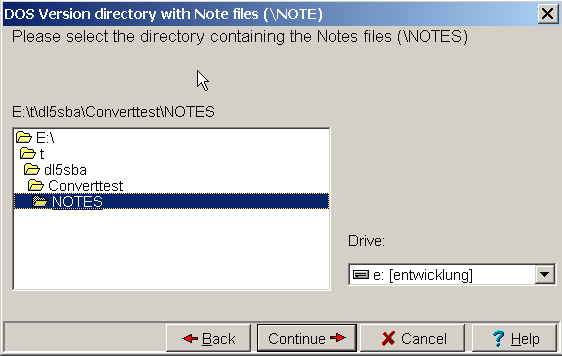
When asked for the Notes directory, enter the directory where the notes are
stored. The directory is usually named: \SWISPROG\NOTES
Special Options
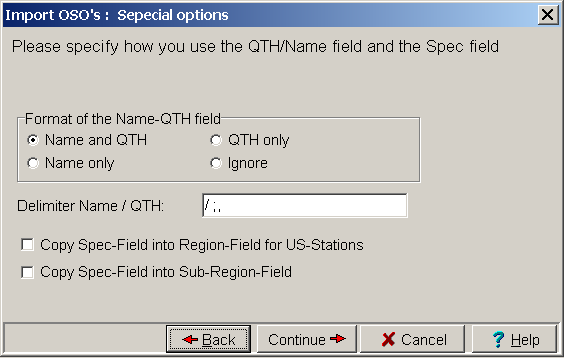
The following items can be specified in the above dialog window:
-
Format of Name_QTH Field: specify how
you entered the Name/QTH in SWISSLOG Version 3 DOS. If you select
"Name and QTH" the contents of the field will be split into a
Name and QTH and moved into the corresponding fields.
-
Delimiter Name / QTH: specify the characters you used to separate
the name from the QTH.
-
Copy Spec-Field into Region-Field for US-Stations: if you entered the name of the US state into the
Spec-Field mark this checkbox. The Spec-Field for US stations will then be
moved into the Region-Field.
-
Copy Spec-Field into Sub-Region-Field: if
you entered regional information like DOK, DFM, etc. into the Spec-Field
mark this checkbox and the Spec-Field will be moved into the Sub-Region
field.
Variable Fields
If you have used variable fields then the Field Assignment Dialog window will
be displayed whenever SWISSLOG encounters a variable field without defined
mapping.
Copyright © 2004 SWISSLOG
Last modified:
11 nov. 2025