Transceiver-Control
Swisslog's Transceiver control allows you to automatically set the transceiver frequency/mode in the QSO, tune transceiver to a DX station from DX windows/Band Maps, display transceiver's S-Meter/Power Output and some other interesting features. You can configure up to 8 different transceivers and switch between them easily.
This section contains information about:
Select Options ¦ Transceiver Interface > Transceiver 1 from the main menu (repeat for transceiver 2-8 if needed). The following dialog is displayed:
Transceiver: list of the supported transceivers. Select yours from this list.
Name: set a comprehensive and short name to this transceiver (model is suggested). This name will be displayed in the following places:
Transceiver Control window title
In Options ¦ Transceiver Interface > main menu, instead the default Transceiver 1-8 text.
When using more than one transceiver and
clicking on the transceiver number, in a list containing all
names of transceivers.
Swisslog also interfaces with TRX control programs. The programs currently supported are:
OmniRig by VE3NEA
OmniRig is a FREEWARE program and can be downloaded from:
OmniRig V2 by HB9RYZ
OmniRig V2.1 is an enhanced FREEWARE version of OmniRig implementing extra features such as support for 4 Rigs or minimum polling interval of 20ms. IMPORTANT: OmniRig V2 is only supported by Swisslog and HDSDR. Use OmniRig v1 by VE3NEA if you want to use it along with WSJT-X, JTDX, MixW, CW Skimmer, etc. Program can be downloaded from:
DX Lab Commander
DX Lab Commander is a FREEWARE program and can be downloaded from:
FLRIG by W1HKJ
FLRIG is a FREEWARE program and can be downloaded from:
TRX-Manager by F6DEX (the distribution of this software is discontinued)
HamLib Net
HamLib Radio Library is a free and can be downloaded from:
Ham Radio Deluxe
Ham Radio Deluxe is a commercial program and can be ordered from:
TCI (Transceiver Control Interface) by Expert Electronics:
Smart SDR by Flex Radio:
SatPC32 by DK1TB:
This
is a not specifically a transceiver control program but it's a very
interesting option for satellite users using this fantastic program.
Swisslog will read the SatPC32's Uplink frequency/mode and the selected
satellite from SatPC32/SatPC32ISS will be set automatically in the
satellite name field of the QSO Entry. The satellite panel will be
visible automatically when starting this transceiver option and will be
hidden when stopping it or when closing SatPC32/SatPC32ISS. This is a very useful transceiver control
option specially for ICOM users where the uplink frequency in satellite
mode is not read.
Start automatically: If this field is checked SWISSLOG tries to start the Transceiver interfaced at start up (recommend!). If it is not set you must select this dialog and press Start to start the Interface or press the power button besides the TX status toolbar.

You can also set QRG/Mode on the TX from this control window:
- QRG: type the QRG in Hz format (with no dots, commands or blanks) and press Enter.
- Mode: select the TX mode from the dropdown list or type mode and press Enter.
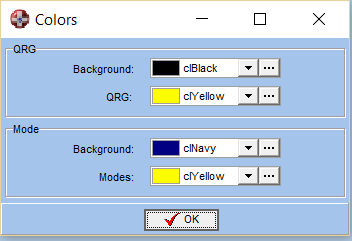
You can customize and change the background and text colors of the QRG / Mode fields. Right click on the toolbar and select Colors in the pop-up menu:
IMPORTANT: When you have configured more than one transceiver, you will see the number of current selected transceiver transceiver on the left side of the frequency. User can easily select any of the configured transceivers by clicking on the transceiver number. A list will be displayed with the assigned transceiver number/name which will allow you to select the desired transceiver. Swisslog will play the sound of the selected transceiver number in morse code.
A "power" button is available to start/stop transceiver control. Green means the transceiver control is started. Red means it's stopped.
Switch ON transceiver at startup / Shutdown transceiver at exit: when these options are available, user can select to make transceiver powered on when the transceiver control is starting and/or powered off when closing Swisslog. Not all transceivers support this feature. Refer to the CAT commands section in the instruction manual. For Yaesu and Kenwood check if the PS command is supported. For ICOM, check if $18 command is supported. Some models (such as IC-7600 or IC-7700) need to upgrade to the latest firmware to support this command. In order to make it work, it's mandatory to change the "Shutdown function" to "Stanbyby/shutdown" in the transceiver menu.
Time between two TX-QRG queries in 1/10 seconds: Some TX do not send information when the QRG or the Mode is changed. Therefore SWISSLOG must periodically read these information. This interval defines the time between two reads. NOTE FOR ICOM: If CI-V Transceive parameter on your radio is ON, set 0 here to disable polling the transceiver. Set any value higher than 0 ONLY if the CI-V Transceive parameter is OFF.
Communication Port Button: press this button to select the Com-Port and set the speed an other options.
Start: press this button to start the communication with the TX.
Stop: press this button to stop the communication with the TX.
Transverter offset: if using a transverter, set here the offset frequency in Hertz. Examples:
In a 144/28 MHz transverter you have to set an offset of 144MHz - 28MHz = 116MHz = 116000000
In a 1296/432 MHz transverter you have to set an offset of 1296MHz - 432MHz = 864MHz = 864000000
ICOM TX-Address: ICOM TX - Address in hexadecimal (2 digits). If you don't know the Address SWISSLOG will search for it. If you have more than one radio connected you should enter the address you want to control.
Scan for TX Address: uncheck this box if SWISSLOG should not scan for the address if the one you entered is correct. IMPORTANT: scan won't work unless the CI-V Transceive parameter on your radio is set to ON.
OmniRig V2: check this option if you have installed OmniRig V2 by HB9RYZ and you want to use its extra functions.
CW is LSB: check this box if your transceiver uses LSB for CW. You will note this if Swisslog reads CW-R when your transceiver is in CW (and viceversa). Swisslog will keep the different settings in this option for Rig1 and Rig2 (Rig1-4 in OmniRig V2).
RTTY is LSB: check this box if your transceiver uses LSB for RTTY. You will note this if Swisslog reads RTTY-R when your transceiver is in RTTY (and viceversa). Swisslog will keep the different settings in this option for Rig1 and Rig2 (Rig1-4 in OmniRig V2).
Port: Default value: 12345. There is no need to change it unless you want to use multiple instances of FLRIG. You must set different XMLRPC ports for every instance of FLRIG in Config > Setup > Transceiver > Server. Example: 12346, 12347, etc.
Program name field accepts command line switches, needed to use multiple instances of FLRIG. Example: C:\Program Files (x86)\flrig\flrig.exe --config-dir c:\Users\Jordi\flrig.files\TS-480 IMPORTANT: Do not use quote marks!
IP Address: Default value: 127.0.0.1.
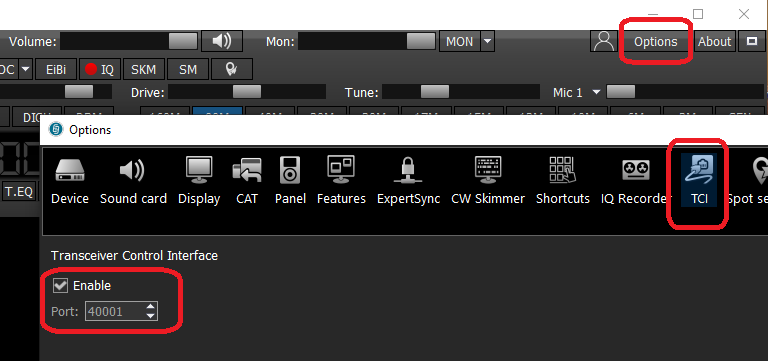
Port: Default value: 40001. Must match with the port defined in ExpertSDR2 software: Go to Options / TCI to enable TCI and check the port number:
When using TCI, all displayed DX messages on every Band Map function will be sent to the Panorama in your SDR. The font color of every DX message in your SDR will match with the background color selected to identify the statistic status (Confirmed, Worked, Need, New or Not Needed). You can disable this feature in the Options menu of every band map.
If you click on a spot in the SDR Panorama, callsign will be automatically entered into the QSO Entry window. You can also select the receiver to be used (1 or 2) by clicking on the receiver number, displayed in green colour in the transceiver toolbar and the transceiver control window:

Swisslog offers 2 options for these transceivers:
FlexRadio 6xxx/8xxx: this is the best option for FlexRadio 6/8 series. This option uses the FlexRadio Ethernet API which offers wide possibilities such as displaying DX messages from Swisslog into the Panadapter of your SDR (see below).
FlexRadio CAT TCP: Select this option if you have a FlexRadio from 3 or 5 series (local or remote).
FlexRadio 6xxx/8xxx:
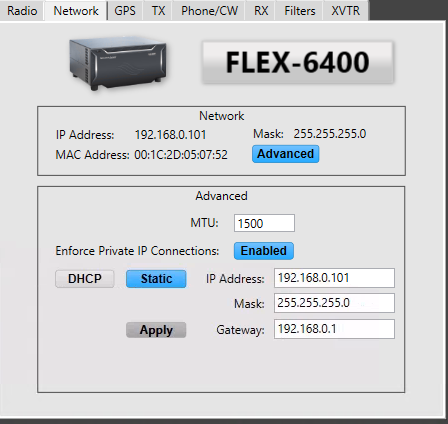
IP Address: Specify here the IP address of your Flex Radio. Check this value in Settings / Network in Smart SDR. Some models allows you to set a Static IP address in the Advanced options. If available, use this option instead of using DHCP because IP address may change often. IMPORTANT: You can press the "Search IP automatically" button to allow Swisslog to search your local network if a Flex Radio is connected and detect automatically the IP address and model number. This function only works if Swisslog is running with elevated privileges (as administrador). Otherwise, assign it manually. IP detection may take from 1 second (connecting your Flex to your router) or up to 2 minutes if you connect it directly into your computer! Keep this in mind and simply wait and not abort!
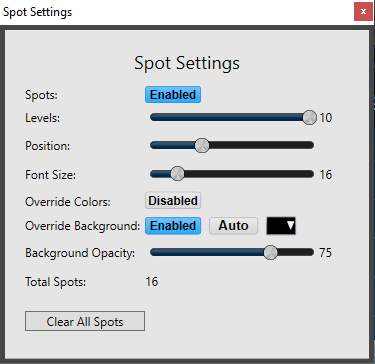
When using Flex Radio, all displayed DX messages on every Band Map function will be sent to the Panadapter in your SDR. The font color of every DX message in your SDR will match with the background color selected to identify the statistic status (Confirmed, Worked, Need, New or Not Needed). You can disable this feature in the Options menu of every band map/WSJT-X / JTDX band map. These are the recommended Spot settings in Smart SDR:
User may decide how Swisslog will operate with your Flex Radio. There are 2 different modes of operation which can be selected in the transceiver control toolbar or the transceiver control window:
- Mode A: Swisslog will always follow VFO A. All tuning operations made from within Swisslog will be set on VFO A only.
- Mode S: Swisslog will always follow the active slice selected on Flex, whichever it is. All tuning operations made from within Swisslog will be set on the active slice only.
![]()
Click on the green letter beside the frequency in the transceiver toolbar or transceiver control window to change mode of operation.
FlexRadio CAT TCP:
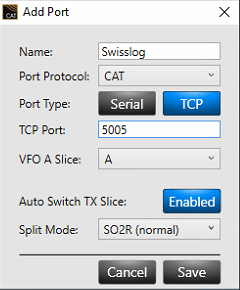
IP Address: Default value 127.0.0.1.
Port: you have to create a new port with SmartSDR CAT to be used exclusively by Swisslog (see the screenshot below). By default Swisslog suggests to use port 5005 but you can use any other whenever is not in use. SmartSDR CAT already creates by default a CAT TCP port in port 5002. You can use this port if it's not used by any other application (i.e: WSJT-X):
DDE Page: SWISSLOG provides a generic interface based on DDE. Some special TX-Control programs do use this feature. If you are using such a program, you should follow the instruction given by this program.
The TX-Interface is used in several SWISSLOG functions. This section gives you an overview. You may find more information in the detail descriptions of the functions.
QSO-Entry - Window
The QRG and Mode are automatically read from the TX when you are entering QSOs in real-time mode.
There are some options of the QSO-Entry window which control the behavior:
Do not set Mode based on TX. If set then the Mode is not taken from the TX.
Set Mode based on QRG. If set then the Mode is always calculated based on the QRG and the band plan. So the mode in SWISSLOG may different from the mode on the TX even when Do not set Mode based on TX is not set.
In the DX Window you can tune the Rig automatically to the QRG of an announced station and back to the previous QRG.
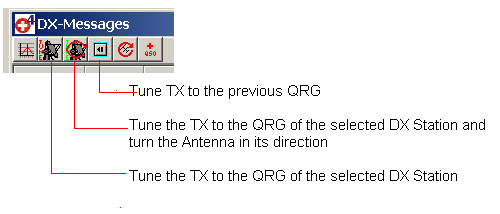
Double click on a spot if you want to tune the transceiver and turn the antenna to the announced DX Station (default option). The same applies to Band Maps.
Besides the TX control window in toolbar, SWISSLOG contains a small but VERY USEFUL TX-Control window which can be activated by selecting View ¦ Transceiver - Interface:
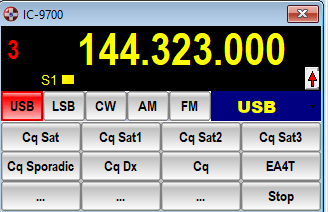
This window offers the
following features:
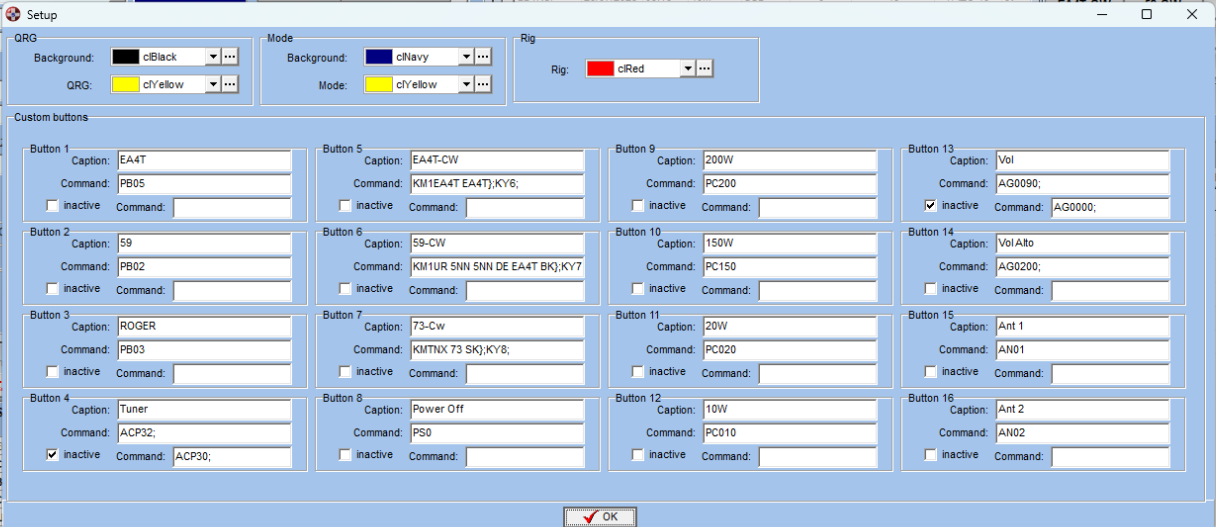
Mouse right click to enter the Configuration dialog, where you can change colors and assign a caption and the command to be sent for every of the 16 available buttons. Check the Inactive option to enable dual action button: a different command is sent when button is pressed (Active) or unpressed (inactive). Custom buttons settings are stored independently for every transceiver!. This is a sample for the Yaesu FTDX-101MP (THANK YOU EA4T!):
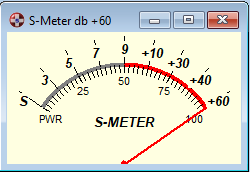
Swisslog implements a customizable and resizeable analog S-Meter and Power Output function in View > S-Meter. This function currently supports the following transceiver options:
The following options and functions are available via the pop-up menu (right mouse button):
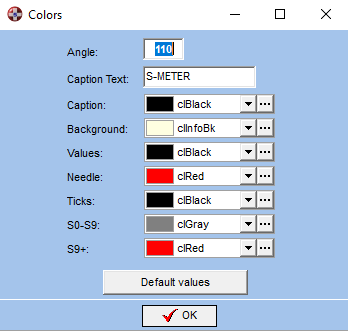
Standalone Window: usually the window can not be moved out of the mainframe of SWISSLOG. If this option is set then the Window can be moved anywhere. This is especially useful for PCs with multiple monitors.
Always On Top: This option is displayed and enabled by default only when window is set as standalone. Window will stay on top over all other windows of other programs all the time. Warning: If this option is unchecked, window can be hidden behind the main SWISSLOG window or even placed outside of the visible space. If you place it outside of the visible space (i.e. when you change the screen resolution) you can only bring it back by editing the SWISSLOG.INI file.
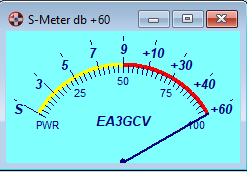
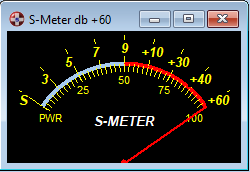
You can create very nice S-Meters! It all depends on your
preferences and imagination! Here some samples (left sample is the
default design):
Copyright © 2004 SWISSLOG
Last modified:07 jun. 2026